What’s UCI Replay? What’s YuJa?
UCI Replay is the campus name for UCI’s lecture capture service. YuJa is the software that powers this service.
Features include:
- Capture your screen, connected camera, and/or audio
- Integrate with Canvas to easily embed recordings
- Automatic closed captioning and slide text recognition
- Trim recordings, adjust captions, and make other general edits through any web browse
- Pre-installed in classrooms & available for download to your own computer
- Private media libraries
- Mobile-optimized recordings
- Option to schedule automated recording in some classrooms
While YuJa was brought to campus with lecture capture in mind, it’s not limited to that purpose. Anyone with an active, current UCInetID can sign in and create an account. Students, for instance, are welcome to create YuJa accounts by signing in through uci.yuja.com. If an instructor enables the YuJa integration in Canvas, students can embed their own recordings anywhere within Canvas where they have access to edit/post content, and where the YuJa integration is available.
Set up YuJa
Download & install software
Using a SmartClassroom computer? YuJa is already installed and ready to go on all standardized SmartClassroom lectern PCs.
If you want to record from your own computer:
- Open https://uci.yuja.com and login, if you have not done so already
- Press Create Recording on the top menu bar
- Press Download to save the application on your computer
Add to Canvas (Recommended / Optional)
If you are an instructor or TA with access to manage a Canvas course space, you have the option of enabling YuJa’s Canvas integration. You do not need to use Canvas in order to use YuJa with your course; you can still use YuJa whether or not you choose to use Canvas.
If you are using Canvas, the YuJa integration has several benefits:
- Easily embed YuJa content in Canvas pages, assignments, discussions, (pretty much anywhere you can add formatted content in Canvas! And this isn’t just for instructors; students can also embed recordings from their own libraries, for instance, to share a recording in a discussion board or submit a recording as an assignment)
- Publish recordings right to an associated Canvas course space to make them available to all enrolled students
- Provide your students with a YuJa link in your course navigation that will help students access the library of recordings associated with your class
- Run live streaming sessions associated with a class
Configure the Canvas integration
- Login to https://canvas.eee.uci.edu
- Open your course space
- Press Settings in the lower-left
- Open the Navigation tab
- Drag YuJa from the list of hidden navigation items at the bottom of the page, up into the list of enabled navigation items
- Press Save
- Press YuJa in the course navigation menu (left side)
- Your YuJa account will be connected to your Canvas course space, enabling Canvas-specific sharing options
Create recordings
Helpful resources
For some great tips, see these videos from Natalie Hadland, UCI Division of Teaching Excellence & Innovation:
Start a recording manually
- Open the YuJa Software Station application
- Select Single Sign On and UC Irvine, then press Sign In
- In the menu on the left-hand side, adjust Video, Audio, and Screen settings as needed
- Tap your microphone to verify the level bounces under Mic Source
- (Optional) Enter a title and description for your video
- (Optional) Select a class if you are using the YuJa integration in Canvas and would like to make this recording available to an associated class
- Press Start to begin recording
- Press Stop to end recording
- Press Save to post the recording in your private media library
See also: Streaming / recording tips (pdf)
- Open the YuJa Software Station application
- Select Single Sign On and UC Irvine, then press Sign In
- In the menu on the left-hand side, adjust Video, Audio, and Screen settings as needed
- Click on Settings in the upper-right and select Screen Capture
- Set the Frame Rate to 15 frames per second
- Verify the resolution for your computer (or leave the default 1280 x 720)
- Press OK
- Tap your microphone to verify the level bounces under Mic Source
- (Optional) Enter a title and description for your video
- (Optional) Select a class if you are using the YuJa integration in Canvas and would like to make this recording available to an associated class
- Press Start to begin recording
- Press Stop to end recording
- Press Save to post the recording in your private media library
Schedule a recording
OIT Classroom Technology Support can schedule automated recordings to capture the screen and audio (provided the instructor uses one of the provided microphones in the classroom) at instructor request for classes scheduled in the following classrooms:
- ALP 1300
- ALP 2300
- BS3 1200
- DBH 1100
- EH 1200
- ELH 100
- HIB 100
- HSLH 100A
- MDE AUD
- PCB 1100
- PSLH 100
- SSH 100
- SSLH 100
- SSPA 1100
Please note that only ALP 1300 and ALP 2300 have installed cameras to capture video of a class session. Instructors can use the lectern control panel under YuJa to adjust the live video camera settings in ALP 1300 and 2300.
Scheduled recordings are automatically placed in the private YuJa media library of the instructor who made the request. The instructor may edit their recordings and determine if, how, and when recordings are shared with anyone else.
More information about the technology available in specific classrooms is available via the Classroom Technologies website.
Broadcast live
If you are using YuJa with a Canvas course space, you can run a live broadcast for your class by setting ‘Live’ to ‘Yes’ when you are choosing your recording options. While a live session is running, any of your students who access YuJa via Canvas will see a notification inviting them to join the live session.
Manage recordings
Browse & organize
- Login to uci.yuja.com
- Press New Folder to create a folder (or subfolder, if you have already opened a folder and would like to further organize its contents)
- Drag-and-drop individual recordings and/or folders to reorganize them as-needed
- If you would like to organize multiple files at once, press More Options… and select the appropriate files; you’ll then see options for moving, deleting, or downloading all the selected files
Edit recordings
Important: If you are going to make any other edits to a recording, such as trimming the recording duration, make those edits before you work on your captions; always work on your captions last, after any other edits are done, to avoid losing your work.
- Login to uci.yuja.com
- Hover over the recording in YuJa and click Edit from the menu
- The YuJa video editor will open
For an overview of the video editor, see https://support.yuja.com/hc/en-us/articles/360045477574-Video-Editor-Overview
View usage data
YuJa can provide detailed recording usage data. The level of detail depends on how a recording is distributed. If a YuJa recording is embedded on a page within a Canvas course space that is locked down to enrolled students (the default visibility setting for UCI Canvas course spaces), then YuJa will be able to provide detailed, identified usage data.
On the other hand, if a YuJa recording is posted somewhere public where anyone can view it without logging in under a UCInetID and password, then YuJa will not be able to identify those viewers, so some of the data will remain anonymous.
- Hover over the recording in YuJa and click More… from the menu
- In the lower-left, click Analytics
- In the lower-right, click See More
Share recordings
Share with a course via Canvas
- If you have not done so already, add the YuJa integration to your Canvas course space
- Hover over the recording in YuJa and click Publish
- Select the appropriate Canvas course space
- Press Select
- Students will be able to navigate directly from your course to associated videos via the YuJa link in the Canvas course space’s navigation
Let students publish recordings
There are several ways an instructor might have students share recordings via YuJa. Just like instructors, students can use YuJa to create recordings or just to host recordings they’ve created elsewhere and uploaded to YuJa. If the instructor has linked Canvas, students can also embed content from their YuJa media library in any Canvas course space that allows for students to create content with rich formatting (e.g. bold, italic, etc. found when editing pages, discussion posts, and more) following the same steps an instructor would use to embed in Canvas (below).
Another option is to allow students to use YuJa’s Publish process to make their recordings available just like instructor-published recordings. For this, an instructor must first update the course “channel” (YuJa’s term for the course’s library link with Canvas) settings as follows:
- Login to uci.yuja.com
- In the upper-right, click the grid of squares to open your account menu and select Courses

- Select the class from the list on the left (note: YuJa automatically names course channels using your Canvas course space’s titles and month and year the course space was published)
- Press the Edit button under the channel’s title
- Set the Student publishing pulldown to either “Submit for approval” or “Allowed”
Embed in Canvas
- Edit the page, discussion, or other content in your Canvas course space where you would like to embed a YuJa recording
- Click on the power plug icon
- Click on YuJa
- Your YuJa media library will appear (may take a moment); click on the recording you want to embed
- Save your changes to the Canvas course space content
- Students will be able to play the embedded recording within the appropriate Canvas assignment, discussion, page, or other content
Share with specific people
- Hover over the recording in YuJa and press Share
- Start to type the name of a person you want to share your recording with and select the appropriate person from the drop-down list, which YuJa will automatically display to match the text you have entered
- Repeat step 2 for each person (you can add multiple people at once)
- Press Share
- Choose what level of access to provide for each person
- Press Save
Share a link with anyone
- Hover over the recording in YuJa and press More, then Links
- Copy the Direct Link and share this URL with your students or whomever you wish to direct to your YuJa recording
- This option will not provide you with individual analytics
Download recordings
- Hover over the recording in YuJa and click More… from the menu
- Open the Download settings in the lower-left
- Select either Audio Podcast (audio only; no video) or ‘Video Podcast’ (both audio and video)
- Press Request Media
- Select whether you would like your video and audio files to be combined or separate
- If you have chosen Single File, choose a video source (for instance, if you recorded using both screen capture and a classroom camera, you will need to pick which of the two to include in your combined video with audio)
- Press Request Media
- YuJa will begin preparing the file or files for download; when ready, you’ll receive an email with download information
Captions
Automatic captioning
Automatic captioning is available for spoken English, French, German, Italian, Portuguese, and Spanish.
Instructors’ videos are automatically captioned, while student’s videos are not (students can contact us at replay@uci.edu for any questions or requests around captioning).
Instructors will receive an automated email when a video’s captioning has been added, and instructors can edit their transcripts as-needed.
For more information about editing transcripts, see: YuJa – Editing Captions in the Video Editor
Upload captions & transcripts
You can upload your own captions and/or video transcripts as follows:
- Login to uci.yuja.com
- Hover over the recording in YuJa and click More… from the menu
- Click Accessibility in the lower-left
- Click Upload and chose the appropriate file type
- Select your file, specify the language, and complete your upload
Quizzes
General information
YuJa has a quiz feature that makes it possible to embed quiz questions at set points throughout a recording. Participants respond to each question before resuming the recording.
General instructions for creating YuJa quizzes are available from YuJa: Video Quiz Overview
Note that support inquiries for YuJa quizzes are generally escalated directly to YuJa support. YuJa was implemented solely as a lecture capture solution at UCI, the quiz functionality was added later and is beyond that scope so the experts in that area at YuJa’s support staff, who have been responsive and professional in our experience!
Distributing quizzes through Canvas
Instructors can distribute a YuJa video and quiz as a Canvas assignment. This ensures that students are logged in and their YuJa quiz activity can be correctly identified and imported into the Canvas gradebook, if appropriate.
- If you have not done so already, add the YuJa integration to your Canvas course space
- In the Canvas course space, select Assignments
- Select the + Assignment button
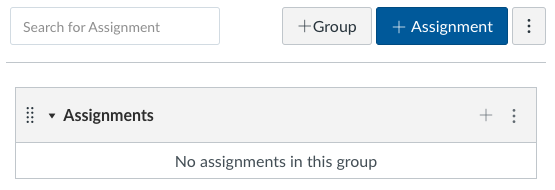
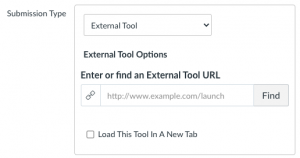
- Under Submission Type, select External Tool and select the Find button
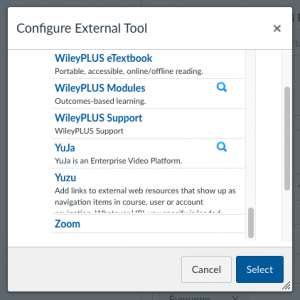
- Select YuJa
- A window will come up with your YuJa media library; under the Quizzes tab, find and select the video quiz you want to assign
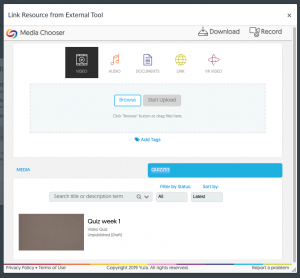
- Once you publish the Canvas assignment, students will be able to view the recording and complete the quiz from within Canvas
The video quiz will behave like any other Canvas assignment, meaning it can have a deadline, will be listed the gradebook, and scores will automatically be added to the gradebook as students complete the quiz.
Troubleshooting
Recordings do not play when using Safari
Safari’s “Prevent cross-site tracking” privacy feature may conflict with YuJa’s playback functionality. Users who have difficulty playing recordings in Safari may wish to try disabling that setting.
That said, the privacy setting is valuable and many may prefer to keep it enabled, in which case we recommend either temporarily disabling the setting in order to access videos and then reenabling it afterwards or using a secondary web browser other than Safari for those actions.
Here is a brief document from Apple about this feature:
https://support.apple.com/guide/safari/prevent-cross-site-tracking-sfri40732/mac
Recording freezes after slides start (Mac)
In July 2019, Classroom Technologies had a support inquiry from an instructor who started a recording while using their Mac laptop, then started their Powerpoint slides, and the recording froze at that point.
This issue was resolved by un-checking a Powerpoint setting labeled “Always start Presenter View with 2 displays” as follows:
- Open your Powerpoint slides
- In the upper-left, find the Powerpoint menu and click Preferences
- Open the Slide Show preference pane
- Un-check Always start Presenter View with 2 displays
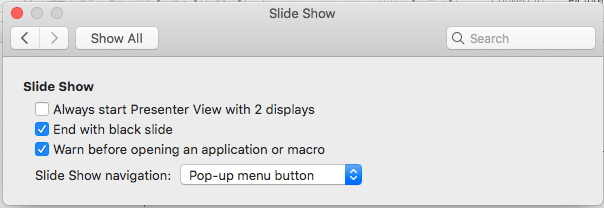
Once this setting is disabled, you should be able to successfully run your Powerpoint slides and record in YuJa.
If you’re experiencing this issue and disabling the “Always start Presenter View with 2 displays” setting does not resolve it, please contact replay@uci.edu for help.
Missing audio
There are several reasons a recording might be missing audio:
- No microphone was in-use
Whether you have a scheduled recording or are recording manually, you need to use a connected microphone in order for YuJa to capture your voice.
With scheduled recordings, any microphone in the classroom should work; as long as you can hear your voice through the classroom’s speaker system, your scheduled recording should include that audio.
With manual recordings, the right microphone depends on the circumstances. For instance, if you’re using a laptop and running the YuJa software on that laptop, then you need to use the laptop’s built-in microphone (if applicable) or another microphone that you have connected to your laptop (note: provided classroom microphones are configured for use with the classroom lecterns and typically cannot be connected to a personal laptop or other device). - The correct microphone was not selected in YuJa
This only applies with manual recordings; you do not need to make any microphone selection with a scheduled recording as that recording will automatically run in the background with preconfigured settings.
If you are recording using the YuJa software on a lectern PC, make sure your microphone selection in YuJa matches one of the options noted on the streaming / recording tip sheet (download PDF; also note: a laminated copy is left in each room, but it may be removed or lost and this PDF is also available under ‘Resources’ on every classroom info page; see https://classrooms.uci.edu/classrooms/ for a full list of classroom info pages).
If you are missing audio and the above explanations do not apply, please contact us so we can investigate further.
Missing video
Mac users: There is a known, but highly unpredictable issue with Mac devices connected via HDMI that may cause missing video in scheduled recordings. Typically, if your screen is visible via the classroom projection system, then your content should be captured, but there are some exceptions. In SSLH 100, for instance, if your screen is visible via the projector, but does -not- appear on the lectern monitor, then your video may not be captured successfully by the YuJa hardware and this is most likely due to the unpredictable Mac issue.
Fortunately, you can use Zoom as a workaround if you encounter any issues with HDMI connections in general or with your video capture in scheduled recordings while working from a Mac connected via HDMI:
- Set the projector source to PC (instead of Laptop > HDMI)
- Launch Zoom on the PC, press Sign In, press ‘SSO’ (in the lower left), enter ‘UCI,’ login to your UCI Zoom account with your regular UCInetID and password, and start a Zoom meeting
- In your Zoom meeting, press the green shield icon in the upper-left to display the meeting’s information, including the ten digit meeting ID
- Launch Zoom on your laptop or other device(s) without logging in to Zoom* (just press ‘Join’ and then enter the meeting ID from your meeting running on the PC to join that meeting)
- In Zoom on the PC, open the ‘Participants’ tab and promote yourself on to host or co-host on your other device(s)
- You should now be able to share your screen through the Zoom meeting running on the PC
* If you usually restrict Zoom meetings to authenticated (logged in) users, you’ll need to disable that setting. Instead, consider enabling the Zoom waiting room so that no one else can join the meeting without your permission, but your own logged-out devices can join.
If you have a scheduled recording that is missing video and you were -not- using a Mac when this happened, please contact us so we can investigate further.
Video Tutorials
YuJa provides a selection of Video Tutorials including:
- PC
- Mac
- General
Older Recordings (Relay / Pre 2018)
On December 31, 2018, TechSmith discontinued support for their TechSmith Relay (Self-Hosted) lecture capture system. Throughout the deployment of YuJa, our current media management and lecture capture solution, we continued to allow (but strongly discouraged) the use of TechSmith Relay. On December 20, 2019 after 10 years of heavy instructional use, we retired the TechSmith Relay lecture capture service.
The UCI Replay TechSmith Relay hosting server (replay.uci.edu) was officially retired in June, 2024. Content owners expecting videos to appear are now directed to host their videos on YuJa. Please email replay@uci.edu with any questions.